Posted Date : 13 Jul 2026
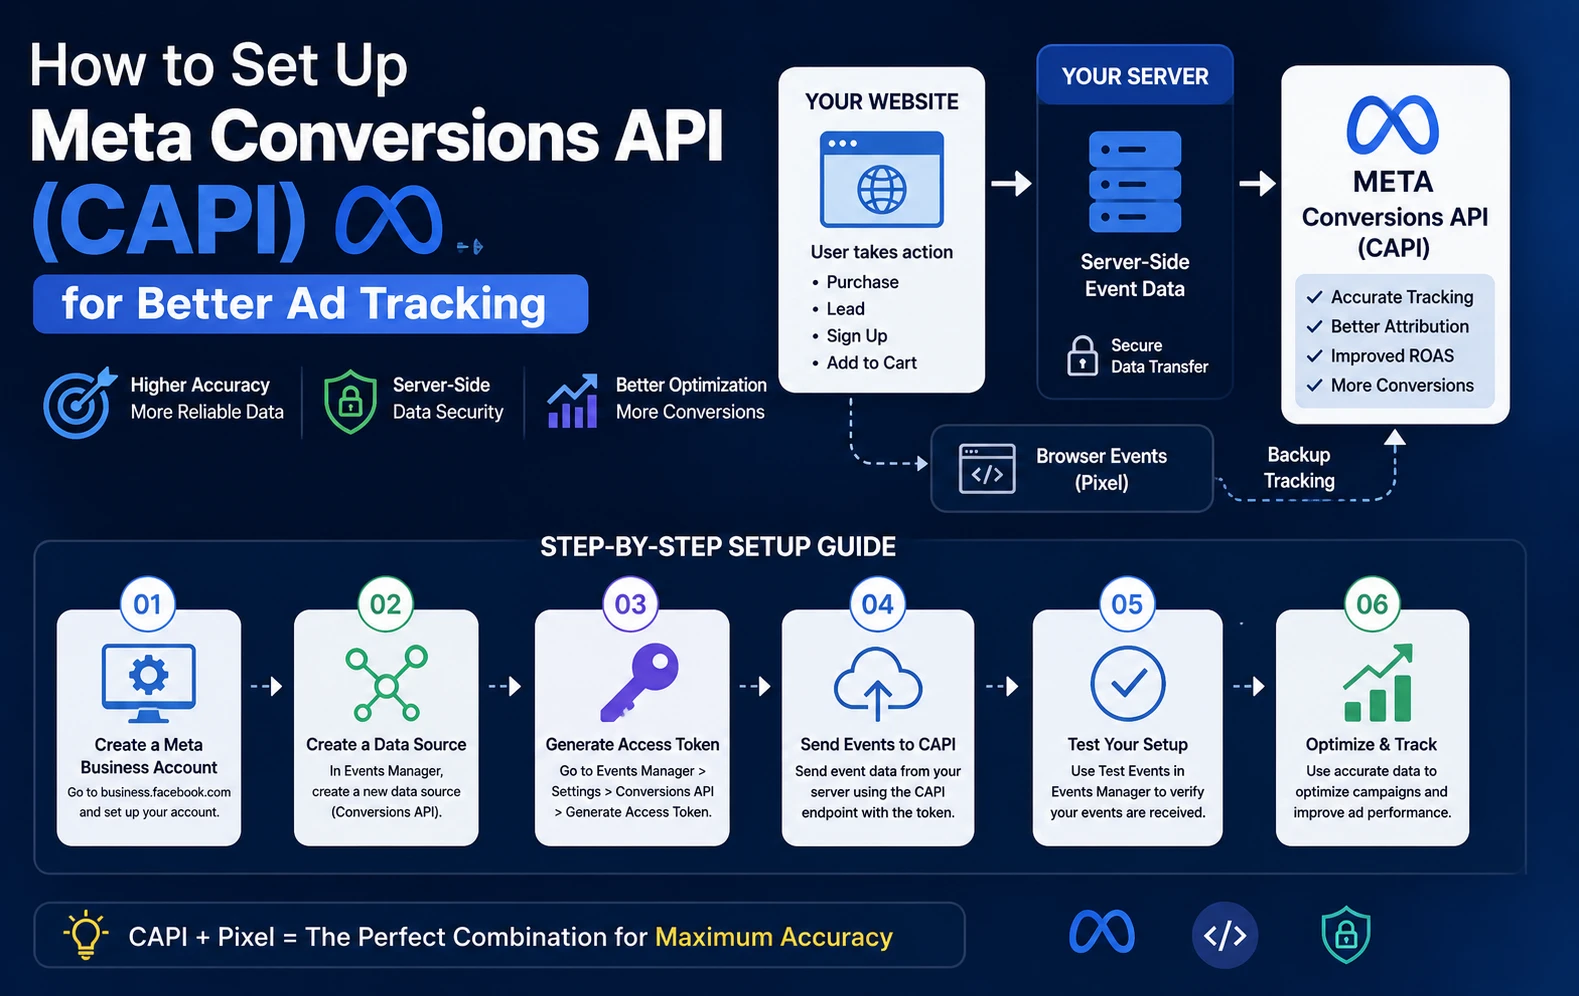
If your Meta Ads Manager numbers have felt less trustworthy lately—fewer reported purchases than your store actually processed, rising CPAs with no clear cause—the Pixel alone is probably the problem. Browser-based tracking has been worn down by iOS privacy restrictions, Safari's cookie limits, and ad blockers to the point where pixel-only setups now miss a large share of real conversions. The Meta Conversions API (CAPI) fixes this by sending conversion data straight from your server to Meta, bypassing the browser entirely.
Here's how to set it up, step by step.
The Meta Pixel is JavaScript that runs in a visitor's browser and reports events like PageView, AddToCart, and Purchase. The Conversions API sends that same kind of event data, but from your server instead of the browser. Because server-to-server communication isn't affected by ad blockers, cookie restrictions, or browser privacy settings, CAPI captures conversions the Pixel misses entirely — including subscription renewals, offline purchases synced from a POS system, and any backend action the browser never sees.
Stores running Pixel-only tracking often see attribution accuracy drop to around 40% or lower, meaning more than half of actual conversions go unreported. CAPI closes that gap.
Important: CAPI doesn't replace the Pixel — it works alongside it. Meta's current guidance is dual tracking: the Pixel for real-time browser signals and CAPI for server-side reliability, with the two deduplicated against each other so nothing gets double-counted.
Before touching any setup screen, confirm you have:
There isn't one "correct" way to set up CAPI—the right method depends on your platform and technical resources. Five main paths exist in 2026:
| Method | Setup Time | Best For |
|---|---|---|
| Meta's one-click CAPI setup (in Events Manager) | Minutes | Standard web events on supported platforms, released in April 2026, are now the fastest path for most advertisers, though they don't cover custom events, offline conversions, or multi-platform routing |
| Shopify native integration | Under 10 minutes | Shopify stores with standard Purchase/AddToCart/Checkout flows—toggle "Share data" to Maximum under Sales Channels → Facebook → Pixel settings |
| CAPI Gateway (Meta's managed, no-code option) | 2–4 hours | Advertisers who want server-side tracking without custom development: it monitors your existing Pixel and automatically sends a server-side copy of each event, handling deduplication for you |
| Server-side Google Tag Manager (e.g., via Stape) | 1–2 days | Teams who need custom events, multi-platform routing (Google Ads, TikTok, LinkedIn), or more granular parameter control |
| Direct/manual API integration | Days, plus ongoing maintenance | Teams with backend engineers who want maximum flexibility and full ownership of the data pipeline |
A reasonable decision rule: start with the simplest option that covers your event set (Shopify native + one-click or CAPI Gateway if you're on another platform), and only move to server-side GTM or a direct integration when a real constraint—custom events, multi-platform tracking, or silent event drops—forces your hand.
If you run Pixel and CAPI together without deduplication, Meta counts each conversion twice—inflating your reported results and confusing automated bidding, including Advantage+. Skip this step and your numbers will look better than reality until you have to unwind it later, which usually takes longer than doing it correctly the first time.
Deduplication works by matching a shared event_id value between the Pixel event and the corresponding CAPI event for the same action. Meta then counts it once, from whichever source it deems more reliable. No-code paths (Shopify native, one-click setup, CAPI Gateway) handle this automatically. Manual and server-side GTM setups require you to generate and pass matching event_id values yourself.
Event Match Quality is the 1–10 score that measures how well Meta can match your server-sent events to real user profiles. The higher the score, the more of your conversion data actually reaches Meta's optimization systems — which directly affects how well Advantage+ campaigns allocate your budget.
To push EMQ higher, send as many hashed customer-matching parameters as you can with each event, including:
With these parameters implemented properly, EMQ scores above 8.0 are achievable and meaningfully improve ad delivery.
Don't send every possible event — over-sending low-value or redundant events dilutes your optimization signal rather than strengthening it. Prioritize events tied to real buying intent, especially further down the funnel: Purchase, Lead-to-qualified-lead, Subscribe, or whatever action represents genuine value in your business. For example, a B2B company generating leads through forms might find only 20% of leads are truly qualified—the fix is to send the "qualified lead" event through CAPI, not just the raw form submission, so Meta's algorithm optimizes for quality rather than volume.
Once configured, confirm CAPI is actually working before scaling any campaign:
If events show as "installed" but aren't actually firing from the server side, you don't have working CAPI—you have a configuration sitting next to a Pixel that's still doing all the work alone.
CAPI isn't "set it and forget it." After launch, keep an eye on:
Pixel-only tracking is no longer reliable enough on its own — too much of the signal is lost to iOS restrictions, Safari's tracking prevention, and ad blockers. Setting up CAPI, running it alongside your Pixel with proper deduplication, and feeding it strong matching parameters is what restores the conversion visibility Meta's algorithm needs to spend your budget efficiently. Start with the simplest method that covers your event set, verify it's actually firing before you trust it, and treat EMQ as an ongoing metric to improve rather than a box to check once.
Note: Exact setup steps and interface options can shift as Meta updates Events Manager. Always cross-check current steps against Meta's own Conversions API documentation before implementing on a live account.

Have a project in mind? Let’s build something amazing together.
Webbitech — A Leading Web Design & Web Development Company with 15+ Years of SEO & Digital Marketing Expertise, Delivering Countless Success Stories
From idea to execution, we help businesses create high-performing websites and applications.
Start your journey today and take your brand to the next level.